Secure your QNap NAS behind a virtual firewall running on it
I own a QNap network attached storage (NAS) and have grown used to store my data centrally in one place only. I would never consider making it reachable from the Internet directly, given the data stored on it, but that's what some people apparently do and need. After the latest wave of ransomware attacks, even QNap is warning against it.
I actually go a step further and want to close off the NAS from my home network as well, as most devices don't actually need any sort of access to it, nor all of the published ports are really necessary.
This page will show how to configure your QNap to safely stay behind a virtual pfSense firewall running on the QNap itself. After this, you can configure the firewall at your leisure and decide on which IPs/ports to expose.
Prerequisites
- A QNap NAS with two physical Ethernet adapters, of which one is not used (see below)
- 4GB or more of RAM on the NAS: there are required for Virtualization Station to be usable
- 512MB of memory available for the pfSense VM: this is the recommended minimum for the VM itself
Diagram
Here's a diagram showing the setup on the QNap and including the home router and home devices in the network:
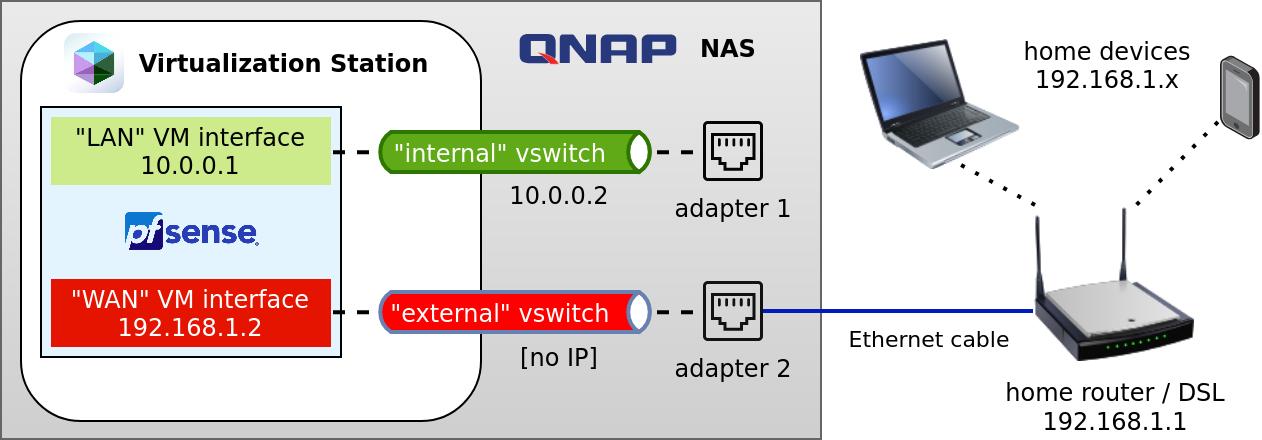
The following items are shown in the diagram:
- home router: The upstream WiFi router, a physical router/firewall providing Internet connectivity. The QNap needs to be connected via ethernet cable to adapter 2 at all times, and the router must be configured to handle static routing.
- home devices: Trustworthy and untrustworthy devices in the home router's network which may want to selectively communicate with services on the QNap.
- adapter 2: The QNap Ethernet adapter 2, which is connected via Ethernet cable to the home router
- "external" vswitch: The virtual switch defined in the QNap network configuration, which bridges adapter 2 to the pfSense "WAN" interface but is configured without IP. This way, the QNap will not publish its ports (i.e. SSH, HTTPS) on this internal network IP.
- "WAN" VM interface: A pfSense VM's virtual network interface which you will have to assign to the "WAN" interface within pfSense and represents the untrusted network (from the firewall's standpoint).
- pfSense: A pfSense VM, with the minimum required two separate networks
- "LAN" VM interface: A pfSense VM's virtual network interface which you will have to assign to a "LAN" interface within pfSense and represents a trusted network (from the firewall's standpoint).
- "internal" vswitch: The virtual switch defined in the QNap network configuration, which bridges adapter 1 to the pfSense "LAN" interface and is configured with an internal IP
10.0.0.2, so that QNap will publish its ports to be reachable on this IP only. - adapter 1: The QNap Ethernet adapter 1, which directly connects any client to the internal network ("internal" vswitch). For this reason, this Ethernet port should only be used from trusted clients (such as the setup laptop).
Configuration steps
1. Preparation
Connect your setup machine to the QNap via Ethernet adapter 1, which will be your go-to adapter if anything goes wrong. Momentarily disable the QNap internal firewall if enabled, and make sure that the QNap ports for administration (HTTPS, SSH) are listening on every interface.
This is also a great time to make sure that your backups are up to date and to write down the current configuration in case you are forced to revert to it afterwards.
Now log onto the QNap and make sure you are actually connected to the right adapter by checking the "Network & Virtual Switch" configuration: you should be able to recognize that adapter 2 is set as the default gateway, and you are communicating via Ethernet cable.
Switch to the "Advanced" mode and open the "Virtual Switch" view: you will then proceed to add the two new virtual switches with the "Advanced Mode" (also the type of virtual switch somehow), but without any physical or virtual adapter assignment yet. The following switches must be created:
- "internal": the virtual switch with static IP
10.0.0.2, subnet255.255.255.0 (/24)and default gateway10.0.0.1(which is going to be the firewall's IP in this network). I also prefer having the QNap work as a DHCP server here: this might help in case the pfSense does not boot and you want to save a couple of seconds later on. - "external": the virtual switch with no IP assignment.
NAT is not needed and might create problems, whereas IPv6 can be either deactivated, or you may configure it with the same settings as IPv4.
2. pfSense installation
The next step is all bout installing and configuring pfSense, for which this QNap tutorial will help, with the following changes:
- the pfSense VM requires 512MB: you may add more at will, but 4GB as the link above suggests is definitely overkill.
- same goes for the 250GB disk in the screenshots: you will need no more than 4GB disk space.
- make sure to note which VM adapter you are internally assigning to "WAN" and which one to "LAN".
- configure the virtual machine to start automatically at boot: you will need the firewall to get networking on your QNap, after all.
- the LAN interface should have a fixed IP address
10.0.0.1, and the same subnet255.255.255.0 (/24)as above. - in case you haven't configured the "internal" virtual switch with a DHCP server: you may want to activate the pfSense DHCP server on the LAN interface.
- the WAN interface IP could be either fixed or DHCP based: if choosing the latter, pfSense will get an IP from your home router.
Go ahead and add your first pfSense WAN firewall policy: allow any IP to connect to 10.0.0.2 on any port, so that you won't be locked out for the next steps.
The following lines show the main pfSense screen after the configuration (except you won't have a WAN IP yet)
*** Welcome to pfSense 2.5.1-RELEASE (amd64) on firw ***

 LAN (lan)       -> vtnet0     -> v4: 10.0.0.1/24
 WAN (wan)       -> vtnet1     -> v4/DHCP4: 192.168.1.2/24

 0) Logout (SSH only)                  9) pfTop
 1) Assign Interfaces                 10) Filter Logs
 2) Set interface(s) IP address       11) Restart webConfigurator
 3) Reset webConfigurator password    12) PHP shell + pfSense tools
 4) Reset to factory defaults         13) Update from console
 5) Reboot system                     14) Disable Secure Shell (sshd)
 6) Halt system                       15) Restore recent configuration
 7) Ping host                         16) Restart PHP-FPM
 8) Shell
3. Cut-off point
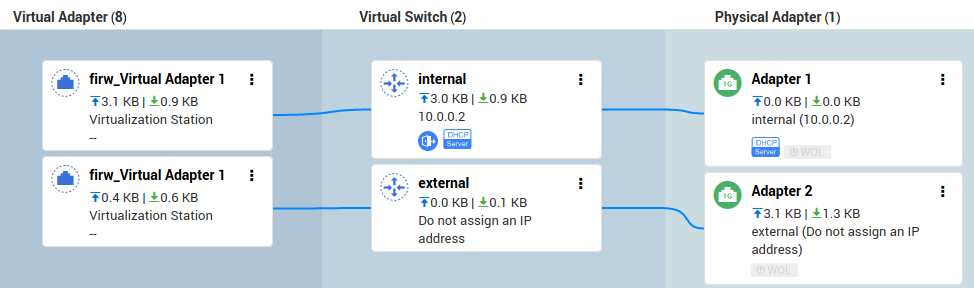
It's now time to assign network adapters to the "external" and "internal" virtual switches in this order, see also below for the resulting assignments:
- "external": assign to this virtual switch the pfSense machine's virtual adapter which you assigned to "WAN" within the VM, as well as the Ethernet adapter 2 of the QNap.
- "internal": assign to this virtual switch the remaining pfSense machine's virtual adapter (assigned to "LAN" within the VM), as well as the Ethernet adapter 1 of the QNap.
This last step will momentarily cut you off of the QNap interface. Do reconnect via the same Ethernet interface once the network is back up, and you will be assigned an IP by the QNap (or by pfSense, if choosing the latter option).
One last piece of crucial information: in the "Interfaces" view of the QNap "Network & Virtual Switch" you will need to select "internal" as a fixed default gateway (perhaps counterintuitively). You should then be able to see the QNap reach the Internet again via the Ethernet adapter 2 – but this time, all connections are passing through the pfSense!
4. Router configuration
There is more work to be done for your home devices to reach the QNap, still. The router does not normally know of any other IP network other than its own (and the Internet): in the picture above, the network is the 192.168.1.0/24 subnet. The default route for unknown networks is then directed towards the Internet (whichever interface that may be).
A connection to the QNap NAS on the internal IP 10.0.0.2 would be tried on the Internet, which wouldn't work.
Hence, you need to setup a static route on the router itself. This route directs requests to the internal network 10.0.0.0/24 to the pfSense firewall on its 192.168.1.2 IP (in the router's own address space) through the ethernet interface.
Your mileage may wary, especially since routers are normally configured through a web interface, but here's a mock routing table to which you need to add the highlited line:
Destination     Gateway         Genmask         Iface
0.0.0.0         ww.xx.yy.zz     0.0.0.0         dsl0
192.168.1.0     0.0.0.0         255.255.255.0   eth0/wlan0
10.0.0.0        192.168.1.2     255.255.255.0   eth0
With the above configuration, the home router now knows where to find IPs in the 10.0.0.X range, and that's by going through the pfSense in the WAN->LAN policy set.
Disconnect the setup computer from the QNap Ethernet adapter 1 and connect to the home router to test the connection to the QNap on 10.0.0.2.
4. Next steps and caveats
Yoou're almost done: the QNap is now reachable on IP 10.0.0.2 from the Ethernet adapter 1 (direct connection), adapter 2 and from the home router (through the pfSense).
The next steps are, arguably, the most important: configuring the firewall policies. An unconfigured firewall sitting around does not create any issues, but doesn't increase your security either.
The following picture shows the pfSense web interface and how firewall policies can be defined based on aliases: "qnap" in the picture really represents the IP address 10.0.0.2.

Connect to the Ethernet adapter 1 again (connections to the firewall's management interface are blocked by default on WAN) and log onto the pfSense web interface.
- WAN policies: configure the policies to allow access to the required ports on the QNap, for example you might want to only allow ports 137-139/445 (SMB) from your home network, and leave other ports (including the management interface, HTTPS and SSH).
- LAN policies: override the default configuration (unrestricted connection LAN->WAN) to restrict which connections the QNap, its software and other VMs can open towards the Internet.
- DNS resolver: you can use the pfSense as a resolver, for example proxying a virtualized Pi-hole on the QNap.
- VPN: the pfSense can also work as a VPN, so that you could use this to tunnel into your home network from the Internet (I don't recommend to allow access to the internal network directly, however)
I recommend you get acquainted with pfSense's features in order to really leverage it as more than just a firewall, especially if you don't have enough space or memory for more machines.
The following issues may also arise:
- You now need the pfSense for networking on the QNap: if either the VM does not work or is not started, or if Virtualization Station is stopped (as is the case during upgrades) – your QNap will not be reachable from the Ethernet adapter 2.
- In order to connect to the QNap directly, you should use the Ethernet adapter 1 from a trusted device. The connection will be direct and you will have bypassed the firewall.
- Some home routers have issues with static routes and may randomly forget them: when debugging a connection issue, make sure that you try using a
traceroutefirst before assuming the problem lies with the innocent pfSense. - Also, your router may randomly decide to assign pfSense a new DHCP IP address... making its own static routes useless.