Set up a Qubes VM for storing your passwords
It's no secret in the world of Information Security that using a Password Manager is safer than re-using passwords, or trying to remember them (even if there are methods of creating memorable passwords that have a high complexity).
A password manager is, by its very nature, a perfect target for criminals trying to steal login credentials and personal data. I'm strictly referring to classical, off-line password managers. On-line password managers have a way broader attack surface, and I don't recommend trading their ease of use for security.
In a classical Operating System, the password manager is an application running with the same user privileges and storing data accessible from the local storage, or even running within a Web Browser. It is trivial, therefore, for an attacker who has compromised a user account, to steal any credentials stored on the machine. A pass-phrase protecting the password store would not work, either, since that could be trivially sniffed with a key-logger.
The philosophy behind QubesOS, instead, proposes identifying the different workflows that are performed on a computer, and isolate them to the desired degree by using one different Virtual Machine (VM) for each one. Qubes builds on the Xen Hypervisor, and provides easy-to-use tools to, among others:
- Create Virtual Machines and set up their network connections
- Display applications running in different VMs on the same screen, albeit visually separating them depending on the origin VM
- Copy and paste between VMs with special key codes that only the hypervisor can control
The ideal setup of a password manager within Qubes, therefore, is to dedicate a specific VM with no network connection at all and as few packages as needed to the task of storing and retrieving passwords. To copy the passwords to other VMs that need them, the hypervisor special key codes can be used (on a standard installation: <Ctrl>+<Shift>+C to copy one VM's clipboard to the buffer, and <Ctrl>+<Shift>+V to replace the target VM's clipboard with the buffer)
The target setup
We're going to be using pass, a command-line password manager based on the Gnu Privacy Guard and the Git version control system, in that gpg encrypts every credential separately and handles their folder structure and git stores their history.
Additionally, I use the smartcard reader built in my laptop to store my GnuPG keys on an OpenPGP card. The integration in the gpg suite and especially gpg-agent for caching the card's PIN is seamless, so that even external programs that use gpg --decrypt to decrypt files don't even need to know that a card is used.
I'm going to explicitely mark the extra commands needed to enable the OpenPGP card usage, however. Using a PGP card requires installing extra packages (most notably the PCSC Daemon) and connecting potentially malicious USB devices to the password VM, which is arguably less secure than using a regular GnuPG setup.
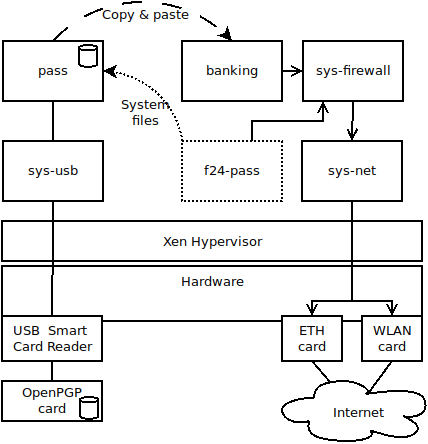
Here's the conceptual diagram of the target setup, with an example VM (banking) receiving the password via copy&paste:
Step 1: template installation and cloning
The first step regards the installation and cloning of a minimal fedora 24 template, and bases upon the steps described on the official website. It's always recommended to clone the template in order to keep a clean main template, so we're going to do just that by creating a f24-pass template for the password VM.
Run the following commands in a terminal in dom0:
sudo qubes-dom0-update qubes-template-fedora-24-minimal
qvm-clone fedora-24-minimal f24-pass
If you have installed the template already, skip the command on line 1 but do execute the command on line 2 to clone your template.
Step 2: template configuration
Start the f24-pass template and open a xterm with a root terminal in it with, either through the graphical interface, or using the following commands (in dom0, still):
qvm-start f24-pass
qvm-run f24-pass "xterm su"
Now the terminal window from the f24-pass template should appear. The following commands are to be executed inside the template's terminal as root.
dnf update
dnf install pcsc-tools gnupg gnupg2 gnupg2-smime pass dbus-x11 pinentry-gnome3 bash-completion oathtool qubes-usb-proxy
shutdown now
The template will be updated, and the extra packages which are installed are those needed for a minimal fedora image to support the card reader, the PIN entry functionality of GPG, and the pass and OTP tools as well.
Step 3: password VM configuration
After the f24-pass template has been shut down, the password VM can be created, based upon that template and allowing no network connections at all.
For that purpose, run the following commands in dom0:
qvm-create --template=f24-pass --label=green pass
qvm-prefs --set pass netvm none
You have now created a green VM called "pass" which will be used to handle your passwords and should therefore be backed up regularly. Now start it and run xterm in it with the following commands in dom0:
qvm-start pass
qvm-run pass xterm
The terminal should appear. We are now going to check if the USB smartcard reader can be recognized by the machine, so first run in the pass terminal (as user user):
pcsc_scan
Which should output "Waiting for the first reader..." as no reader has been assigned to the VM yet: we need to connect the USB card reader first, then find and connect it to the password VM using qvm-usb.
List all the USB devices with the following command (in dom0):
qvm-usb
Find your device by looking at the identifiers and descriptions. Copy and paste the ID you have found (in the example, sys-net:4-2) and run the following command (again, in dom0) to assign it to the password VM:
qvm-usb -a pass "sys-net:4-2"
You should see the command pcsc_scan in the VM terminal now recognize the connected readers and return a status such as "Card state: card removed".
Try also inserting your OpenPGP card and running gpg --card-status, the card should be recognized and ready to be used by GnuPG.
Step 4: GnuPG card and pass configuration
Now go ahead and either set up your OpenPGP card from scratch, or copy the .gnupg directory from an already working installation, if the card has been set up already.
Once done, set up your pass password store or copy a working password store to the VM.
Here's how a working installation looks like:
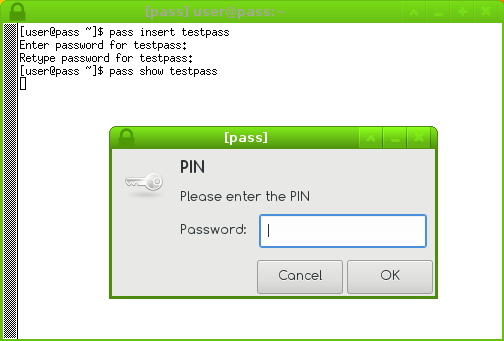
I highly recommend using the -c parameter that allows you to copy the password to the keyboard, and with the successive keystrokes <Ctrl>+<Shift>+C in the password window, followed by <Ctrl>+<Shift>+V and <Ctrl>+V in the target machine you want the password to be copied to. Of course, successive calls won't require you typing the PIN, thanks to gpg-agent maintaining an active session with the card.
Step 5: 2-factor with oath
Your password VM will have also oathtool installed, which allows you to generate time based OTP tokens. These are normally used for a 2-factor authentication, however, so you must understand it might be preferable to keep those on your phone (with Google's OTP application, for example) instead.
Anyway, if you want to use the password VM to generate OTP tokens as well, you need to:
- Generate new 2-factor tokens for the services that allow these tokens
- Normally these services expect you to scan a barcode with your phone, but there's often a "text mode" instead, where the OTP secret can be copied and pasted
- Copy and paste this secret to the password VM and save it with
pass insert
In order to generate a toke, chain the pass and oathtool commands together, as follows:
oathtool -b --totp "$(pass show 'otptest')"
Note that the command above assumes a specific format of the saved OTP secret, but I can confirm working for the most famous services that offer 2-factor authentication. Save the command you use more often as aliases or as scripts for easier usage.
Step 6: VM launcher creation
In order to have a launcher in dom0 that will also connect the reader, you will need to have a small script to be saved i.e. in ~/bin and called with a launcher in the toolbar. Here is mine, noting that my card reader's device id is 058f:9540:
#!/bin/bash

set -o errexit
set -o nounset

vm="pass"
reader=$(qvm-usb --list | grep "058f:9540" | awk '{ print $1; }')

qvm-start $vm && qvm-usb -a $vm $reader && qvm-run $vm xterm
Happy Qubing!